You open the pantry to grab the cinnamon and three half-empty bags of chips topple onto the counter. There are two jars of peanut butter (both opened), a mystery can with no label, and a box of pasta that may have expired during a previous presidential administration. Sound familiar?
If you’ve ever wondered how to organize a kitchen pantry without spending a fortune or an entire weekend, you’re in the right place. Whether you’ve got a sprawling walk-in or a single narrow cabinet, this guide walks you through a realistic, repeatable system that actually sticks. No Pinterest-perfect pressure, just smart pantry organization ideas that make cooking faster and grocery trips less wasteful.
Let’s turn that avalanche zone into the most satisfying door in your kitchen.
Why Pantry Organization Actually Matters
A messy pantry isn’t just an eyesore. It quietly costs you money and time. You buy a third bottle of soy sauce because you couldn’t see the first two. You toss expired snacks you forgot you owned. You stand there, hangry, unable to find anything for dinner.
A well-organized pantry fixes all of that. You’ll know exactly what you have, what you’re running low on, and where everything lives. The payoff is real: less food waste, lower grocery bills, and meals that come together without the daily treasure hunt.
Step 1: Empty It Out Completely
This is the step everyone wants to skip, and it’s the one that makes the biggest difference.
Pull everything out. Yes, everything. Set it all on your counter, kitchen table, or floor. You can’t organize a space you can’t fully see, and you’ll almost always find more than you expected hiding in the back.
While the shelves are bare:
- Wipe down every surface (crumbs and sticky rings live back there)
- Check for any signs of pests
- Lay down a wipeable shelf liner if you want easier future cleanups
A clean, empty pantry is your blank canvas. It also gives you an honest look at how much space you’re actually working with.
Step 2: Declutter Without Mercy
Now sort everything you pulled out into three piles.
- Keep — Items you use and that are still good
- Toss — Anything expired, stale, or opened and forgotten
- Donate — Unexpired food you simply won’t eat
Be honest in this step. That specialty flour you bought for one recipe in 2022 isn’t coming back into rotation. Check expiration dates as you go, and if a packaged food is unopened and within date, set it aside for your local food bank rather than the trash.
This is also the moment to notice your patterns. If you found four open boxes of crackers, that tells you snacks need a dedicated, visible home (more on that below).
Step 3: Group Items by Category
Before anything goes back, sort your “keep” pile into logical categories. This is the backbone of pantry organization, and it’s how grocery stores keep thousands of items findable.
Common categories that work for most kitchens:
- Baking — flour, sugar, baking soda, vanilla, sprinkles
- Breakfast — cereal, oatmeal, granola, pancake mix
- Canned goods — beans, tomatoes, soups, broth
- Pasta, rice & grains
- Snacks — chips, crackers, granola bars, nuts
- Condiments & oils — vinegars, sauces, cooking oils
- Spices & seasonings
- Drinks — coffee, tea, drink mixes
Keep your categories practical for your household. A family with kids might need a big “after-school snacks” zone, while an avid baker may want their baking section front and center.
Step 4: Assign Zones Based on How You Use Them
Once grouped, give each category a home based on frequency and who’s reaching for it.
- Eye level is prime real estate. Reserve it for daily-use items like coffee, cereal, and snacks.
- Upper shelves are for backups and rarely used items, like that holiday roasting kit or bulk paper goods.
- Lower shelves are perfect for heavy items (canned goods, bulk grains) and for kid-friendly snacks if you want little hands to be independent.
Think of it like a store planogram for your own habits. The things you grab most should require the least effort to reach.
Step 5: Choose the Right Containers and Tools
Here’s where pantry organization goes from “tidy” to “transformative.” The right storage solves specific problems, and the wrong purchases just add clutter. Before you buy anything, measure your shelf depth, width, and height. The single most common mistake is buying beautiful containers that don’t fit the actual space.
We’ll get into specific recommendations in the next section.
Step 6: Label Everything
Labels do two things: they make your pantry look polished, and they tell everyone in the house where items belong, so the system survives past day one.
You can go fancy with a label maker and printed tags, or simple with a chalk marker on the container itself. Either way, label the contents and, if you decant into containers, jot the expiration date or cooking instructions on the back.
Step 7: Maintain It (The Part Nobody Talks About)
An organized pantry isn’t a one-time event. To keep it that way:
- Shop your pantry first. Before any grocery run, glance at what you already have.
- Use the “first in, front out” rule. Push older items forward so they get used before the new stuff.
- Do a five-minute reset weekly. A quick straighten after you unload groceries prevents the slow slide back into chaos.
Top Pantry Organization Essentials
You don’t need to buy every product on the internet. You need a handful of the right ones. These are the categories that deliver the biggest visual and functional payoff, organized by the exact problem each one solves.
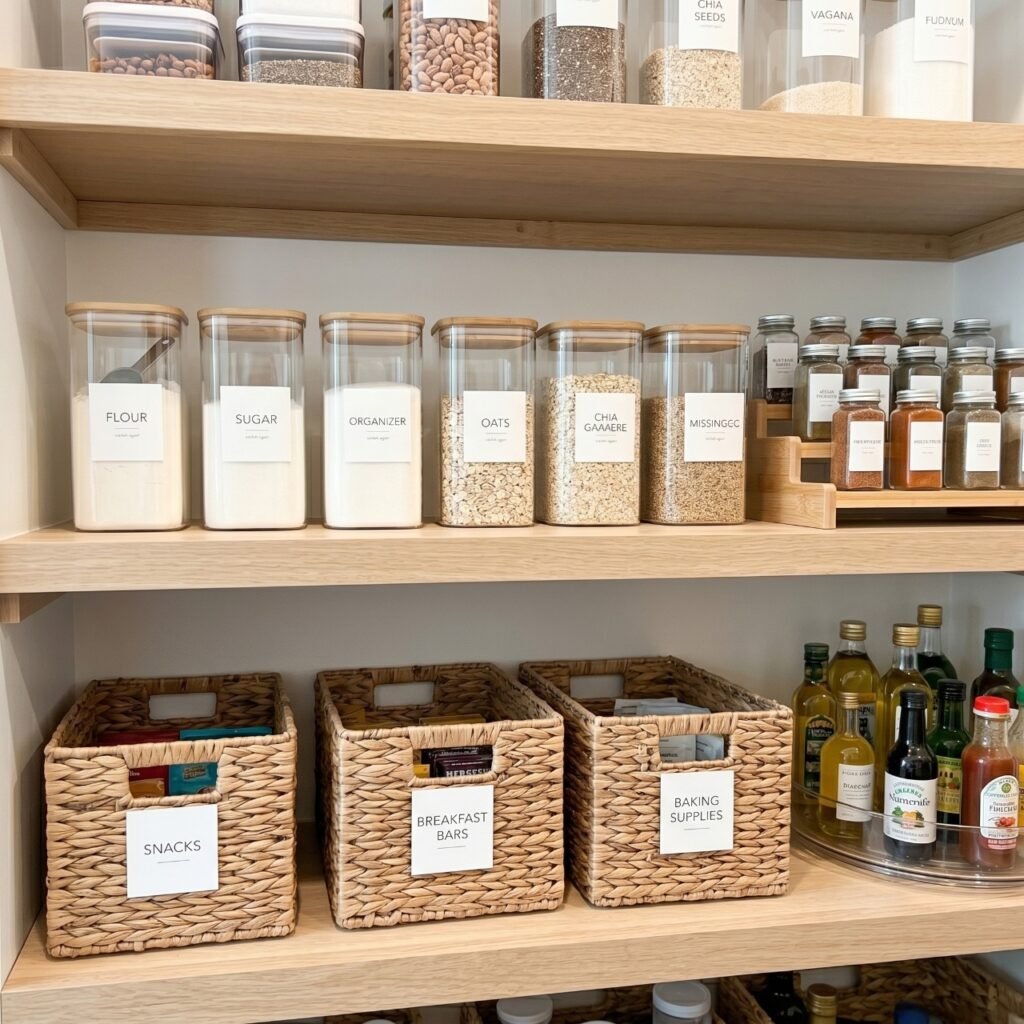
1. Clear Airtight Containers
The problem they solve: Flimsy bags fall over, spill, go stale, and hide how much you have left. Mismatched boxes waste vertical space.
Clear, airtight containers fix all of that at once. Decanting flour, sugar, pasta, rice, cereal, and snacks into uniform containers keeps food fresh far longer, deters pantry pests, and lets you see your stock at a glance. Square or rectangular shapes are smarter than round ones because they don’t waste the gaps between containers. As a bonus, the visual uniformity is what makes those satisfying “before and after” pantry photos possible.

- Help Organize Your Kitchen and Pantry— Imagine every time walking to your kitchen or pantry, found everything is neatly …
- 4 Size Combinations Fit Your Needs — Our kitchen storage container set comes in 4 different sizes. Includes 6 Tall Conta…
- Airtight Containers Keep Food Fresh — The side-locking lids with silicone gasket make these storage containers airtight,…
2. Lazy Susans (Turntables)
The problem they solve: Items get lost in the back of deep shelves and corners, never to be seen again.
A turntable turns dead corner space into accessible storage. One quick spin brings the hidden back row right to your fingertips, no more knocking over bottles to reach the one behind. They’re ideal for oils, vinegars, sauces, condiments, and small jars. Look for ones with a raised lip to keep bottles from sliding off.

- ORGANIZE EVERY SPACE IN YOUR HOME: Organize everything-perfect for organizing your kitchen, your refrigerator, your craf…
- NON-SKID SURFACE: Never worry about your items falling off; the non-skid surface on turntables is molded into the platfo…
- RIMMED EDGE: The outer rim prevents items from falling off, non-skid surface keeps items in place while rotating.
3. Tiered Shelf Organizers and Spice Racks
The problem they solve: You can only see the front row of cans or spices, so the back two rows become a graveyard.
Tiered organizers lift the back rows so every label faces you. For spices, a tiered rack means no more pulling out ten jars to find the cumin. For canned goods, a stair-step shelf transforms a flat, crowded shelf into a fully visible display. This is one of the cheapest upgrades with one of the biggest “I can finally see everything” effects.

- A Complete Spice Tool Set – 1 x 4-tier Spice Rack, 28 x Square Empty Glass Spice Jars, 386 x Spice Labels, 1 x Collapsib…
- 4 Tier Spice Rack – Made of strong steel and powder coatings electrostatic spray finished; Inclined design make it easy …
- 28 Glass Spice Jars – Made of lead-free durable glass; Feature sift and pour lids allow you either shaking or measuring …

- FUNCTIONAL ORGANIZER: Create more space in cluttered cabinets and pantries with this very functional organizer
- PERFECT FOR ORGANIZING PANTRY GOODS: Each shelf is 2.75″ deep, perfect for organizing spices, soup or vegetable cans, sa…
- NOT LIMITED TO JUST THE KITCHEN: Use outside the kitchen to organize cosmetics, perfume, skincare products, figurines, a…
4. Wire or Woven Storage Baskets
The problem they solve: Small, loose, oddly shaped items (granola bars, seasoning packets, single-serve snacks) become a chaotic pile.
Baskets and bins corral all those category groups you created in Step 3 into neat, grab-and-go units. Instead of digging, you pull out the whole “snack bin” or “breakfast bin.” Open wire baskets keep contents visible and let you slide a whole zone out like a drawer, while woven bins hide clutter behind a cleaner look. Both work; choose based on whether you want to see in or not.

- Set of 2 black wire storage baskets with rose gold handles for home organization
- Convenient, portable storage for produce, bath & body items, office or craft supplies, and more
- Stackable design saves space on countertops or in pantries or cabinets; can be used individually or stacked
5. Over-the-Door Organizers
The problem they solve: You’re out of shelf space and ignoring an entire wall, the back of the pantry door.
An over-the-door organizer reclaims that vertical space for free. It’s perfect for flat or small items like spice jars, snack packs, foil and wraps, or extra condiments. For renters especially, this is a no-damage way to nearly double usable storage without a single screw in the wall.

- Maximize Your Space: Our 9-Tier over the door pantry organizer is designed to make the most of your storage space, allow…
- Durable & Strong: Made with high-quality, durable metal, our pantry organization can withstand the weight of heavy cans …
- Quick & Easy Installation: No tools or drilling are required to install our pantry organizer over any standard door. Thi…
Small Pantry Solutions: Maximizing a Tight Space
No walk-in? No problem. Some of the best pantry organization happens in the smallest spaces. The strategy shifts from “spread out” to “go vertical and modular.”
- Use shelf risers to create a second level on a tall shelf, effectively doubling your storage on each tier.
- Hang organizers on the door to keep the shelves themselves clear for bigger items.
- Choose stackable, uniform containers so you use every cubic inch instead of leaving air gaps.
- Add a slim rolling cart in a gap beside the fridge or counter for overflow pantry items if you have no dedicated closet at all.
In a small pantry, every product should earn its place by being stackable, see-through, or wall-mounted.
Frequently Asked Questions
How do you organize a deep pantry?
Deep shelves are notorious for swallowing items into a black hole in the back. The fix is to make the back accessible without unloading the front. Use pull-out wire baskets or shallow bins that slide out like drawers, place lazy susans in corners and on deep shelves, and reserve the very back for backup stock and rarely used items. Keep daily-use items in the front. The goal is that nothing requires you to remove three things to reach a fourth.
What is the best way to store snacks?
The best way to store snacks is to remove them from their bulky original boxes and group them in a clear bin or basket at a height that matches who eats them. Decant individually wrapped snacks (granola bars, fruit snacks) into a single open basket so you can grab and go, and pour loose snacks like crackers, pretzels, or chips into airtight containers to keep them fresh and visible. For households with kids, keep approved snacks in a low, dedicated bin so they can serve themselves.
How often should you reorganize your pantry?
Do a full deep clean and reorganization every three to four months, ideally when seasons change or before a big holiday cooking season. Beyond that, a quick weekly reset, straightening items and checking for expirations as you unload groceries, keeps the system running so you never have to start from scratch again.
Your Clutter-Free Pantry Starts Today
Organizing your kitchen pantry isn’t about achieving magazine-cover perfection. It’s about building a simple system that saves you money, cuts food waste, and makes everyday cooking feel effortless. Empty it out, declutter honestly, group by category, assign smart zones, add the right containers, label it, and keep up with quick weekly resets. That’s the whole game.
The best part? You can start with a single shelf this afternoon and feel the difference immediately.
Now it’s your turn. Which pantry problem is driving you the craziest right now, the snack avalanche, the mystery cans, or the bottomless deep shelf? Drop a comment below and share your before-and-after pantry makeover, we love seeing them. And if you’re ready to upgrade your space, check out our recommended pantry organization essentials above to grab the exact tools that make it all click into place.
Happy organizing!